Showing posts with label DIY. Show all posts

July 19, 2013

Harry Potter Party


Yes Yes, I know, bad blogger. Feel free to slap me on the wrist.
But I am about to make up for it! Because you see, I have here this little gem of a DIY. Host your very own Harry Potter themed party! My little sister turned 11 two weeks ago. And as my fellow potter heads know, 11 is like, a big deal. A really big deal. So of course we had to throw her the most extravagant Harry Potter party there ever was, in honor of such an accomplishment. I mean really, making it to 11 years old without doing herself or other great harm? That's pretty impressive. 


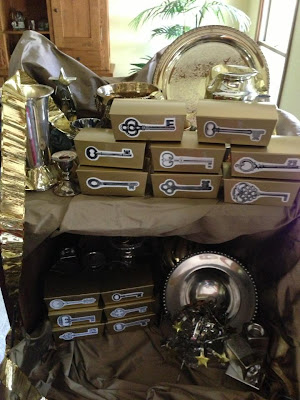
 Basically the set up was; the kids came through the front door/platform 9 3/4 where they met Professor Trelawney (aka me) who helped them pick a "vault" at Gringotts, with some Galleons in it to spend at the party. 


(to decorate Gringotts, we just took a computer hutch that we had, emptied it out, and found tooooons of shiny items around the house that were gold or silver. And a lot of stuff from Goodwill that we just spray painted gold, then placed in the hutch)


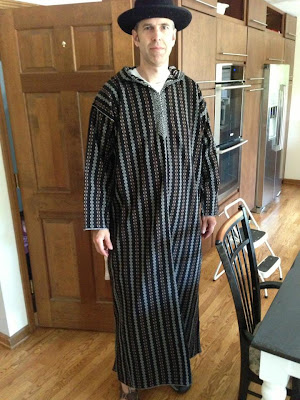
Next they were ushered to Mr. Ollivanders to purchase a wand. Lincoln dressed up as Ollivander and did that station. Basically Quincy had made tons of wands to choose from (using this tutorial), so Lincoln would act all crazy like that mysterious wand maker and tell them to try this wand by "giving it a wave", when they waved the wand he would pull a string surreptitiously tied to his leg that would pull down a picture from behind him. To which the kids would gasp and Lincoln would go, "Oh dear oh dear. Not your wand my good fellow. Not your wand at all." And then let them pick the wand they wanted. And of course, in return for his services they paid him one galleon. 
Once all the kids had arrived, they sat in our living room for the sorting. When their name was called they'd go sit on the chair in the front, don the witches hat, and mom would call out what house they were in (it was all previously organized on a list). Then they got a sticker with their house seal on it for the Gringotts box, and went and sat with their house. 
Next they split up into stations, depending on what house you were in. 
The first station was, of course, a horcruxe hunt! My aunt had hidden horcruxes all around the backyard for them to find. The snake, the locket, the ring, the cup, the diary, a pair of harry potter glasses, and the diadem. Whoever found all of them first got a reward of galleons and candy!


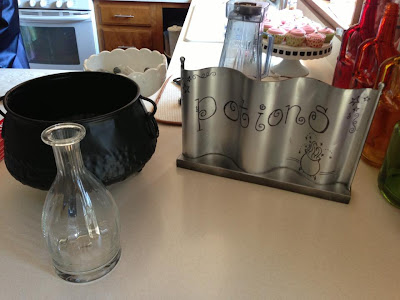
Station two was Potions with Professor McGonagall, because Snape was on a much needed vacation. We had all sorts of bottles (all from Goodwill) filled with different liquids, powders, dried leaves etc. And they combined them in their cauldrons and poured them into little vials that they could wear around their necks. They had to buy certain ingredients with their galleons of course, because that stuff don't come cheap!


Third station was my station, I was Professor Trelawney of course - and as you can tell, I was super awkward and weird. True to character - and therefore I was set up in the gazebo with a diviniation station. Mom told me to basically bs my whole way through the 20 minute session and make up prophecies/read palms. Yeah that didn't work out so well. So I ended up giving a quiz instead, and they had to pay me a galleon just because. Then when they left they got a prize of their choice; bubbles, silly straws, or a slinky. 


Last station was of course, Quidditch! Because no Harry Potter party is complete without Quidditch. Dad, as Kingsley Shacklebolt, was referee. Students had to rent their brooms with 2 galleons. And the point of the game was to get as many balls through the hoops as you could, while Dad was playing Keeper/Bludger. Yes, bludger. He was trying to knock them off their brooms.
During the Quidditch station, Lincoln would run out as a Dementor and attack the kids, who had to cast a patronus charm to fend him off. If they got tagged they had to freeze and wait for someone to help them. After the dementor gets scared away, out comes the chocolate! Everybody got one bar of chocolate to help them regain their full strength (I know. This is epic. I don't even - gah). 

At the end of the rotation of stations (ha! That rhymes!), students convened in the Great Hall (aka our living room) for a counting of all the house points (during that whole time we could award students house points with stickers for doing good things/knowing stuff). The winning house (Hufflepuff!) got to go to Honeydukes first and purchase candy with their remaining galleons. Then everybody got the chance to go purchase candy, and stuff it in their face. 


The meal at the Great Hall was, of course, cupcakes with pink lemonade frosting (they were delicious), and butterbeer. Which my mom and Quincy had made that morning. It's a combination of cream soda, rum flavoring, whip cream, milk, and other delicious stuff. Several kids were addicted to the stuff, and Quincy went so far as to say that "the rum is my favorite!"
Obviously we're doing a very good job keeping her on the straight and narrow. 


Deuces


June 25, 2013

DIY Laptop Sleeve

Hey there! Many of you may have seen me post on facebook, twitter, instagram whatever, that I made a laptop cover for my new Macbook Air! And as promised, here is the tutorial + some basic tips and tricks.

In case you didn't catch the link up there ^^^ just click here for the full tutorial from Design Sponge
But in this post I'll include my own tips and things you should probably know before starting this tutorial for yourself.


I got my fabric at JoAnn's fabric store, in the other tutorials I've seen online they've just used a thicker material that would provide a lot of protection - such as wool - and they always have a liner for the inside. Personally I wanted to make my cover look a little more Vera Bradley, so I opted for quilting material. Which is thick, as requested by the tutorials, and quilting fabrics are two sided so you don't have to buy several different fabrics if you don't want too. 
In my case I just bought one yard of the quilting fabric you see above, although I might have been able to do it for 3/4 of a yard. But this way I have enough extra fabric to do something interesting with! (If I ever get off my lazy butt that is...) 


I followed the pattern to the letter. At first I was worried because the quilting fabric looked so much thicker than the wool they used in their pictures, but eventually I was like, "Screw it. I'm doing this." And I promise you it worked out fine. 
I cut out 4 pieces of fabric to the exact dimensions they tell you to (Tip #1 - make sure you cut the fabric EXACTLY. I did it a little wonky and it caused me grief in the next steps)
The first challenge is the zipper, my zipper was about 14-15 inches long I believe, which was just a little shy of my measurements for my fabric, so I opted to put the zipper at the shorter end of the case instead of the long way (opposite of what they did in the tutorial, but it really doesn't make a difference).
Tip #2 - when aligning the zipper, it's okay if it doesn't completely come to the edge/corners of your material. I was a little worried about that but It turned out to be not a big deal.


This is what the seams look like on the zipper when I was all done with that part. Honestly I should be receiving awards right now for this zipper - it's kind of amazing.


At this point, I was so relieved that I got that zipper in and it was working, that I kinda sorta maybe just a little bit raced through the ending and ended up with a weird mess of fabric that I somehow contorted into a proper case. 
Tip #3 - When sewing up the lining and exterior fabrics, make sure to read the directions VERY CAREFULLY. I just sorta skimmed and then did stuff. It was whatever, but I kind of wish I had been more careful about sewing up onto the edge of the zipper, because there's a little hole in mine where the zipper ends sometimes stick out.


This is the side seam when I was done sewing both the lining and the exterior, and finally flipped it right side out.


My laptop fits in it perfectly! 
Tip #4 - Keep on using your laptop to make sure that the seams aren't too tight, or too close together so that the rectangle shape you make is too small for your laptop! The tutorial doesn't give you an exact inch mark to start the seam at, so it's really up to you!


 It's a good thing you can't see it, but I will tell you, that the right side of the lining is completely not sewed. I just stuffed it in there without sewing it, and I am totally not ashamed to say that.


The inside fabric/lining/other side of the quilted fabric.

Note: I am literally a beginner sewer. Like you may think I'm just saying that, but seriously. I started this with absolutely no knowledge. Sure I've made the occasional pajama bottoms, pillowcase, etc, but it's been such a long time that I didn't even know what a bobbin was when I started this project. My mother and my sister had to teach me most of the set up at the beginning because I am completely hopeless. So if I can do this, you can do this. Cross my heart and hope to die. 


The completed project!
Please excuse my crazy eyes, it was a little late and I was a little excited about finishing the case.

Dueces

June 22, 2013

Let's Get Inspired

I feel like I haven't written in forever, not that there has been much to write about, but still. It's been a few days.

I have to admit something. I have a Pinterest addiction - I feel like I should probably join some kind of meeting group or something, "Hi my name is Madison, and I'm a Pinterest addict."
I'm sure one of those exist somewhere!
But I was on Pinterest the other day, mainly looking at quotes because I was feelin' in the mood for some inspiration. I've printed some of them out and stuck them on the wall next to my bed so I can see them everyday. 


Here are some of the ones I printed and some of the ones I didn't print but wanted to;


I hope you get inspired and maybe use some of these quotes to make your own inspiration wall!

Dueces

June 1, 2013

Music Saves The Soul

So for graduation my wonderful parents bought me a new Macbook Air! (YIPPEEEE!)
So lately I've been going through the process of downloading all of my music from our home computer onto my laptop to take to college with me. Unfortunately, a few songs wouldn't switch computers, and I was missing a good chunk of my collection. 
Not to fear! Modern technology is here!
I found a website that will let you convert any youtube video into an mp3 file that you can download and it will pop up in your iTunes!
So guess what I've been doing the past 3 days?
That's right! Converting and downloading!
Behold my friends, the greatest DIY I have ever made:


Yes, yes, yes. I know. You are all very welcome.

Enjoy free music!

Dueces

July 5, 2012

Frustration

You may have noticed some changes... again... on da blog.
If you haven't, seriously, please get your eyes checked. And possibly your brain.
One of my many faults is really that I'm never satisfied with what I have, I always want more. It could be because my parents spoil me (not likely, since they don't), or it could just be because I'm an irrational human being. Thinking about it, it's probably the latter.
I've been experimenting with changing the HTML of my blog, through a bunch of tutorials I've found and templates I stumbled across. Why do people make it look so easy? Cause it's not.
I hate technology.

So although I'll still be tweaking things, I'm still looking for someone to help me through the process (aka do it for me). Because seriously, I couldn't be more lost if you dropped me in the middle of the ocean.
So if you see, hear, learn about, google, or whatever, ANYBODY who does blog designs. Please. I'm begging you. e-mail me.
A cluttered blog is my pet peeve. Especially my own!

Before the weather got so hot I nearly melted, I did another DIY project! However, it turned out badly.


I took some black thrifted jeans and cut them into shorts.


This is the bleach I used - I don't know if it's 100% or what, but it sure worked well! I didn't want to use too much and waste it, so I put it in a spray bottle


I cut off the cuff of one of the legs to do a quick strip test - just to see how the bleach would effect the color. 


This is the look I ended up with, to be honest, I hate it.
Here are some pointers to make sure you don't hate yours too;
>>DEFINITELY do a strip test. It gives you and idea of the finished product
>>The bottle I used was, versatile. Depending on how you turned the nozzle you could make it spray in a concentrated squirt, or a more misty one. In the above picture, 1. is the concentrated squirt - and 2. is the misty patch.
>>Make sure you cut a little lower than you want! I accidentally cut one leg too short, now I can't roll it up very well - and the edges will be fraying like crazy! Ugh. 

Although my shorts didn't turn out so hot, hopefully yours will! I'd love to see a link below, so don't be shy!
Plus, I think I have a new plan for these lovely shorts 'o mine. But we shall see...